The development of an injection molding tool is not a linear process from design to production. It is a process in which decisions made early on have direct consequences for quality, cost, and delivery time—and in which close collaboration between the designer, toolmaker, and manufacturer is essential for a successful outcome.
Nevertheless, its complexity is often underestimated. An injection molding tool is not a standard component that can be specified without prior analysis. It is a precision tool that must be tailored to the specific part, the plastic material in question, and the production process in which it will be used.
This article walks you through the development process step by step—from the initial idea to a validated, production-ready tool.
Step 1: Subject Analysis and Requirements Specification
It all starts with the workpiece. Before a tool can be designed, there must be a clear understanding of what the workpiece is intended to do, under what conditions it will be used, and what requirements apply to tolerances, surface finish, and function.
It’s about answering a number of fundamental questions: What function must the part fulfill? Which dimensions and tolerances are critical? What loads must the part withstand, and what are the requirements for surface quality and finish? Finally, the expected production volume is crucial, as it directly influences the choice of the number of cavities and the steel grade.
The answers define the framework for everything that follows. A medical device application has different requirements than a technical cable conduit, and this is directly reflected in the tool’s design, choice of steel, and tolerance requirements.
Step 2: Selecting a Plastic Material
The choice of material is closely linked to the workpiece analysis, but deserves its own consideration. The plastic material not only affects the properties of the workpiece—it also influences how the tool should be designed and dimensioned.
Different materials have different requirements regarding injection pressure and process temperature, shrinkage and tolerances, surface treatment requirements in the mold cavity, as well as venting, cooling, and steel type. A material such as PEEK requires processing at high temperatures and places special demands on the steel and cooling system. Standard polypropylene is far more forgiving. Steel Grades for Injection Molding Tools – Selection of Tool Steel
Step 3: Design for Manufacturing
Once the part and material have been defined, the manufacturing process begins. It is crucial here that the part is designed not only for its function but also for the manufacturing process it will undergo.
Design for Manufacturing involves adapting the part’s geometry, wall thicknesses, draft angles, and transitions so that it can be produced efficiently and consistently in the injection molding process. Parts that are not optimized for production result in defects, scrap, and the need for post-processing.
Typical adjustments at this stage include introducing draft angles for easy ejection, optimizing wall thicknesses to avoid sink marks and stresses, moving parting lines to non-visible surfaces, and simplifying geometries that are difficult to manufacture in steel. Design for Manufacturing in Injection Molding Tools
Step 4: Design of the injection molding tool
Once the optimized blank design is in place, the actual tool design can begin. This is where all technical decisions come together in a design that can be manufactured and put into production.
The design determines the cavity layout (single-cavity vs. multi-cavity molds), the sizing of cooling channels, the ejection system, as well as the parting line and the directions of pull.
The choice of gate system is a key decision at this stage. In the vast majority of cases, a hot runner system is used, in which the molten plastic is kept liquid in heated channels all the way to the gate. This results in shorter cycle times, minimal material waste, and a cleaner part surface without gate marks. In special cases—typically involving very simple geometries, specific materials, or low-volume production—a cold runner system may be appropriate.
During this phase, mold filling analyses and flow simulations are typically performed to identify potential problems such as weld seams, air pockets, and uneven filling before steel is loaded into the machine.
Step 5: Making the Tool
Manufacturing is the physical process by which the design is transformed into steel. It is a process that requires high precision and involves several machining methods: CNC milling of mold cavities and cores, EDM for complex geometries and sharp internal corners, grinding to tight tolerances on mating surfaces and closing surfaces, as well as polishing and, finally, assembly and adjustment of all components.
Tolerances in an injection molding tool are typically in the hundredths-of-a-millimeter range. A manufacturing defect that is not detected early on may require the rework of entire sections and delay the entire project.
Step 6: Test Run, Break-in, and Validation
Before a tool is declared ready for production, it undergoes a controlled test run. During this test, the first workpieces are machined, and the results are systematically inspected against the specifications.
The test run determines whether the mold cavity is filled correctly, whether the tolerances are within specification, whether the surface is free of defects, and whether the cycle time is realistic. Any deviations are addressed during the run-in phase, when the mold is adjusted and optimized. Validation is the formal documentation that the mold and the process meet the requirements. Test runs, run-in, and validation of injection molds
How much does the entire program cost?
The development process from concept to validated tool is an investment that varies significantly depending on the complexity of the part, the number of cavities, the steel grade, and the requirements for tolerances and finish.
It is important to understand that the price of an injection mold cannot be assessed in isolation. Decisions made early in the process—regarding part design, material selection, and the number of cavities—have a direct impact on the total investment and on the operating costs over the mold’s service life. How much does an injection mold cost?
From a finished tool to long-term operation
Once a tool has been validated and put into production, the next phase begins: ensuring that the investment pays off over time. A well-designed tool is a good starting point, but it is maintenance that determines whether it can deliver the expected service life and quality.
The decisions made during the design and manufacturing phases directly affect how easy or difficult it is to maintain the mold during operation. Read more about how preventive maintenance of injection molds is carried out here.
Summary
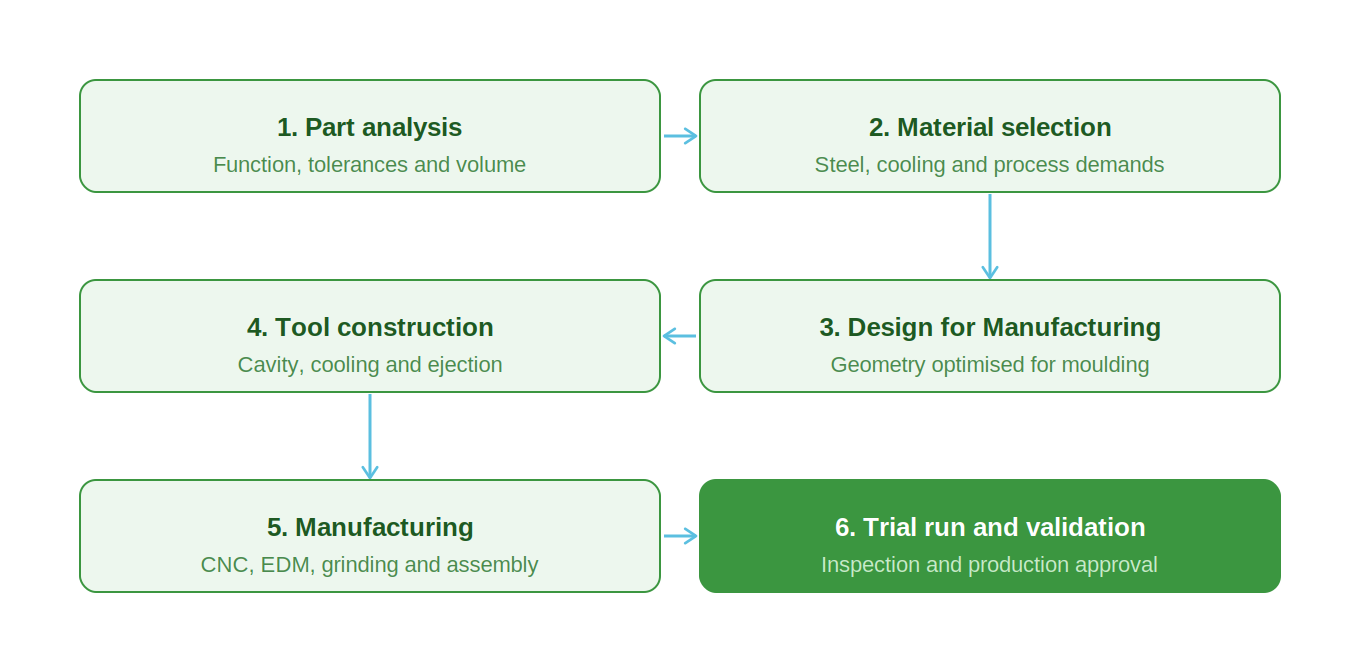
The development of an injection molding tool is a process consisting of six closely interrelated phases: part analysis, material selection, Design for Manufacturing, design, manufacturing, and validation. The quality of each phase depends on the quality of the preceding one.
The most costly errors in a tooling project rarely occur during manufacturing. They arise when decisions regarding workpiece design and material selection are made without sufficient technical analysis and are not discovered until the steel has been machined and time has been spent.
A well-structured development program reduces the risk of exactly that.
Frequently Asked Questions
It depends on the complexity. A simple single-cavity mold can be ready in 6–10 weeks. Complex multi-cavity molds with tight tolerance requirements can take 16–24 weeks or more from specification to a validated mold.
Changes can be made up until the design phase without major consequences. Changes made after manufacturing has begun may require rework and significantly extend the project timeline.
A mold-filling analysis simulates how the plastic material fills the mold cavity. It is used to identify problems such as air pockets, weld lines, and uneven filling before production begins.
No. Even the most thoroughly developed design must be validated in practice. A test run is the only way to confirm that the tool, material, and process function as a unified whole.
? Commissioning is the practical adjustment of tools and process parameters. Validation is the formal documentation that the process is stable and meets the specifications.


